This article deals with Control Panel or CPanel Web Hosting File Manager usage
CPanel is widely used web hosting control panel. Almost all Linux web hosting offers this control panel as the standard Graphical user interface. This page will help you understand the file manager option in your Cpanel completely.
File Manager: It is a program designed to achieve the file operations, just like the way you do on your computer or laptop. It gives various options to create, edit, delete, copy, move, restore, compress, extract and change the permissions of a file or folder.
File Manager is very powerful. At Rank My Hub, we provide our customers with stock CPanel. Your interface might look different if you are reading this article and you are not using our web hosting.
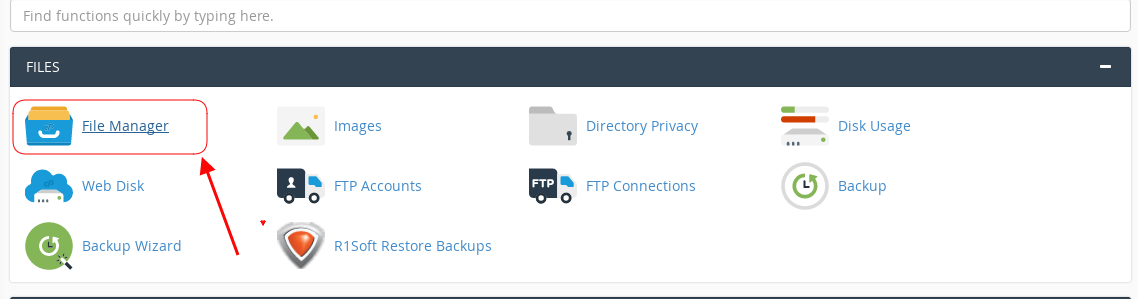
Identifying File Manager Icon is very simple, refer to the picture above. You will see an icon representing files and the Text is written on the right side as (File Manager).
In order to do any operations with files or folders, you will need to use this program. You have to click on this icon and it will open up the new screen like below.
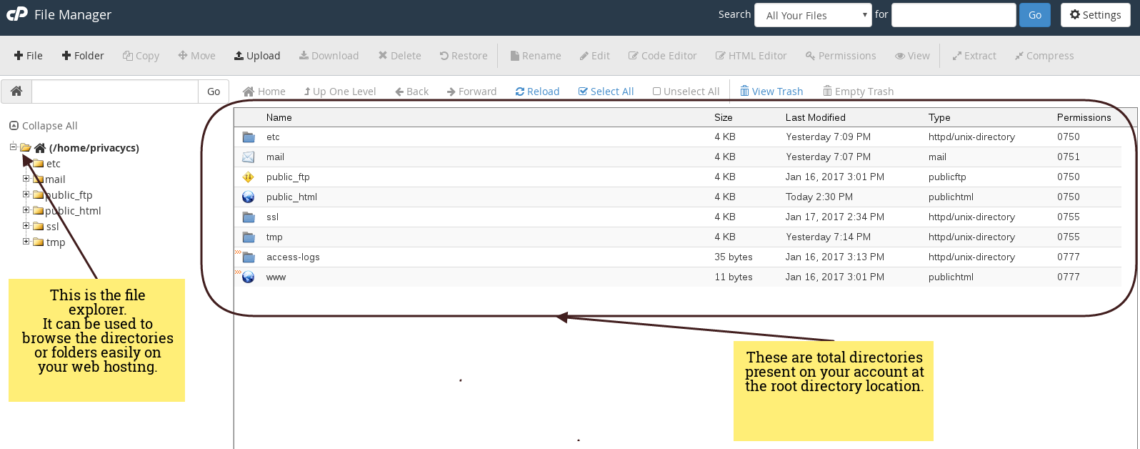
Once you are inside the File Manager, you can see the list of directories and files inside your account. In the above screenshot, you can see the total directories view from root location.
Generally, we will do all operations like uploading website files or folders or resources inside the public_html directory. Hence, I will get inside the public_html directory and will continue the rest of the tutorial.
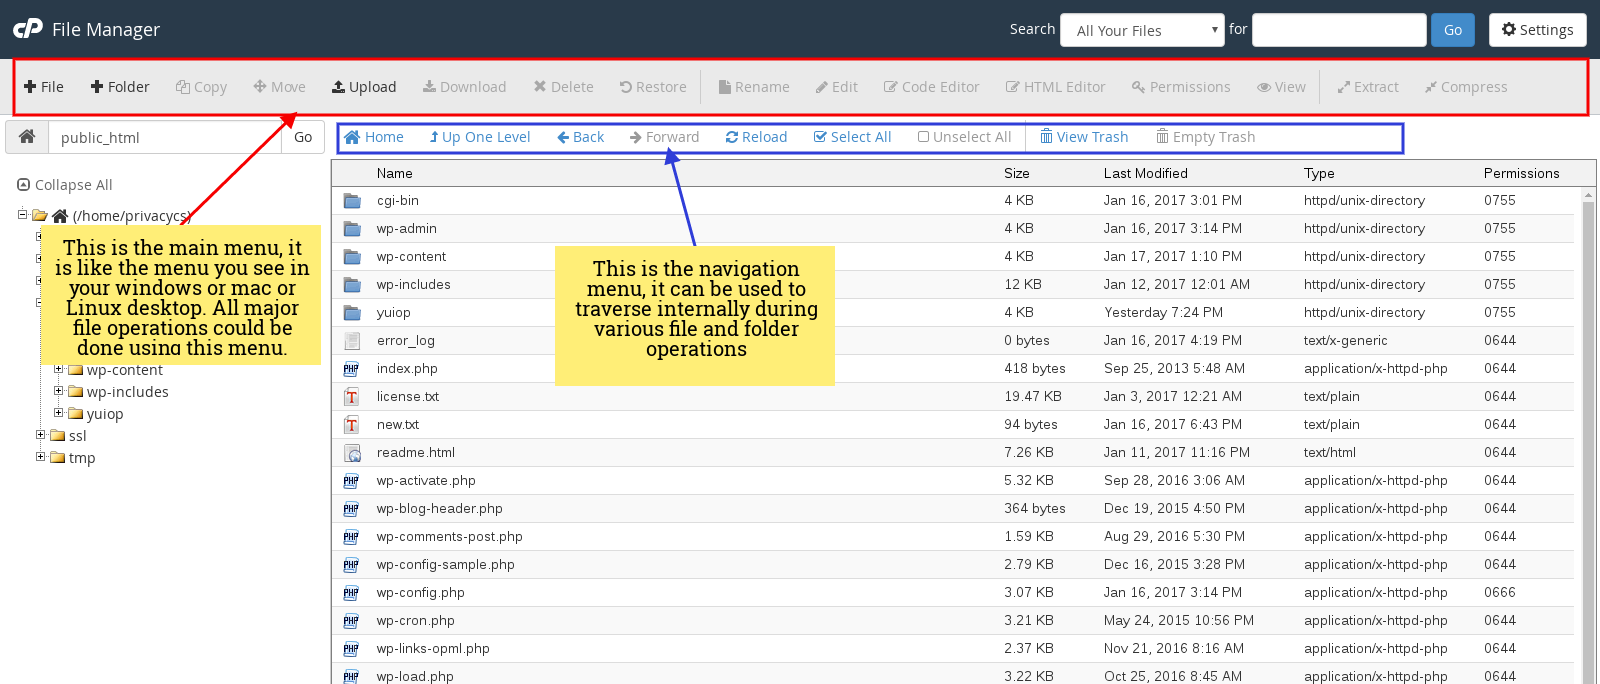
So there are two menus inside the File Manager.
a) Main File Operations Menu
b) Main Navigation Menu
File Operations Menu: It contains various file operations functions. They can be activated or accessed using the respective menu link.
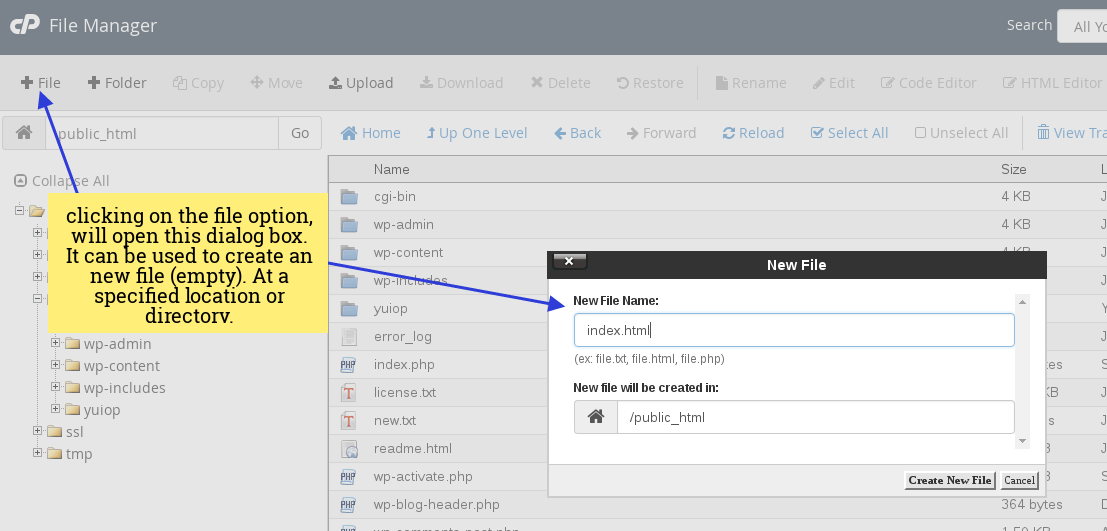
File: This link will open a dialog box, you can create a new file using this menu. It is very useful if you are a developer or if you would like to work directly on CPanel.
You can use this to create a new file with an extension. Very useful for creating empty files inside a folder.
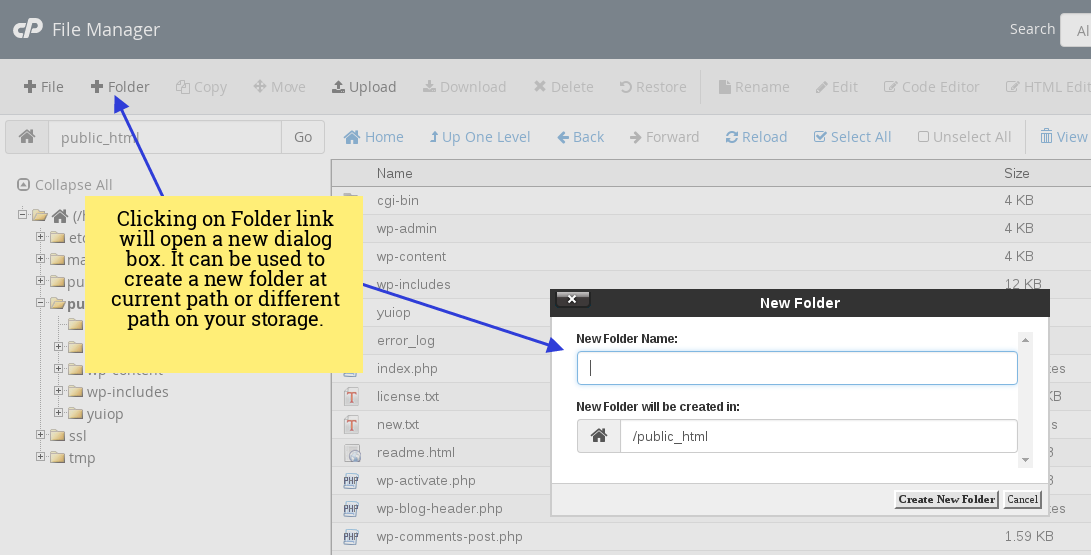
The next option, we can see in the Main menu is the folder. If you click on the folder link in the main menu. A new folder dialog box will be displayed. This can be used to create a new folder at a specific location or current location.
See the screenshot below to get some idea.
The next option is Copy, it gets activated only when you click on a file or folder inside your file manager. Using the copy option, you can copy single file/folder or multiple files/folders or all files or folders from one location to another location. From one folder to another folder.
Please watch the video below to understand how it works:
In the file manager, the next option is Move. It is used to copy a file or folder from one location to another location without leaving behind the copy. It is similar to the Cut operation that you use on your windows computer.
Move is very useful for you in the day to day activities. Using this operation you can move files or folders from one path to another path. You can use Shift or Control buttons on your keyboard to select certain file or folders. You can also use select all from the navigation menu and select all files and then use Ctrl button to deselect from the list. Please watch the video below to understand how move operation works.
The next option is Upload, this is an important option. Using upload option, you can upload a single file or multiple files or folders. Upload option is the best alternative to FTP. You upload the files insanely fast using the upload manager on our web hosting. Watch the video below, to understand how upload option works on CPanel file manager.
Next option, is Download, you can use this option to download a single file or multiple files to your computer or laptop. Watch this video below, to understand how to Download the files from CPanel.
Deleting files is very easy. You can select single file or multiple files and then press the delete link. It will perform delete operation. During deletion, if you just use delete then the files are moved to trash folder.
If you wish to delete permanently, then check the Skip trash option in the dialog box. It will permanently delete the files and folders on which the operation is performed. So, as per your needs, you can use this option.
The delete option is similar to delete and shift-delete in your windows computer file explorer. Watch the video below where we demonstrated how the Delete option works in File Manager.
The Restore option is similar to restore from trash option on your windows computer. If you have deleted files normally (without using skip trash checked in during deletion), then you can go to the Trash folder and select the files or folders you wish to restore and click the restore link. Watch the video below to understand how the restore option works in the File Manager.
The Rename option is used to rename a file or folder. The first step is to select the file or folder that you wish to rename, then a dialog box will be displayed. Once you can see the dialog box, you can enter the new name or rename it and save the changes. Watch the video below, where we demonstrated the rename option in File Manager in Cpanel.
Editing files are easy using the built-in editors in Cpanel. Editors can be used to edit newly created files using file option in file manager or for editing already existing files. There are two editors discussed in the video below:
a) Edit: It gives you simple plain text editor, just like the notepad without any syntax highlighting or other features. This is a very good option if you are comfortable using this editor to make changes. Edit can be used to open almost any kind of file that could be opened using a plain text editor.
b) Code Editor: It gives you some advanced editing features, it also highlights the syntax using colors for supported programming languages. Currently, the version of code editor shown in this video supports the following programming languages:
HTML
PHP
CSS
JAVA
CSS
JavaScript
C
CPP
Coldfusion
Pascal
Python
Perl
Ruby
Robots txt
SQL
T-SQL
Visual Basic
XML
Basic
It also have some features like
Find and Replace
Search
Word Wrapping
Undo and Redo
Toggle Syntax on or off
Reset Formatting
Help and Shortcuts
If you have our CPanel, web hosting, you can open it and learn to use it. Here in the video below, we have demonstrated few things to help you get started.
The next option is the HTML editor, you can use this editor to code HTML websites right from your web browser, you need to check out its interface to start working using it. The HTML editor has visual page editor as well as code base or source code editor. We have made a sample demonstration video, which is below. You can watch it to get some idea about how to use this editor on Cpanel.
The next option is the Permissions.
You need to learn about Linux or Unix permissions to use this effectively. If you are a beginner, learn UNIX file system permissions, you must also ensure that the file permissions are as per your content management system documentation.
In this video below, we will open the file permission dialog box and manipulate some files permissions, to help you understand how to use it in general case. Always remember to use this file permissions settings, only if you are aware that you know what you are doing. Incorrectly setting up file permissions might mess up your website functionality.
Next option is the View. The view can be used to view files in your browser. This is similar to Cat command on a Linux or Unix terminal, but for the browser. Watch the video below to get some idea.
The next two options are very valuable options in the file manager.
1) Extract: It is used to extract folders that are compressed using the following formats:
.zip
tar.bz2
.tar.gz
.tar
You can use extract option to extract the files you uploaded from your computer, this is the best method to upload your website in a compressed file. Then you extract it to public_html directory or the root directory of your domain. The extract is used in so many ways, I am leaving it to your own imagination. This is by far best option in the file manager.
2) Compress: It is used to compress folders or files. You can add files or folders to compressed archives in zip, tar, tar bz2. tar gz.
Compress option can be used to create file and folder backups in CPanel. You can download the compressed files or folders to your computer and save them safely. Similarly, it can be used in many other ways. I will leave to your creative skills.
Now, here is a video made for demonstrating compression and extract options in cpanel file manager. Watch it.
You have made it until the end, great. Now you should be able to use CPanel File Manager efficiently. Thanks for reading this lenghty article.
We hope, it will definitely help you manage your file using CPanel file manager program easily.